Light Conversation — FAQ
Lighting Ideas for Your Dining Room 0
There are many ways to add ambiance to a dining room, but our favorite way is with lighting.
Lighting can set your best mood, highlight artwork, and show off your gorgeous table setting.
Start with the right chandelier, of course. Something that fits both your room and your decor. Check here for how to choose the best size, but it is about more than getting the right size. You have to love your chandelier. That is absolute! If you love a chandelier that has too few lights, add lamps. If you love a chandelier that has too many, turn your dimmer down. We've written a few blog posts about choosing the right chandelier, and we hope you find those helpful. Imagine that gorgeous chandelier shining down on your set table with your family all around. Beautiful!

Adding wall sconces will help brighten a room and fill wall space. Like most lighting, it is both a decor choice and a practical choice. I think there is nothing classier looking than sconces above a sideboard or buffet placed on either side of a mirror or art. A pretty sconce is like its own work of art.
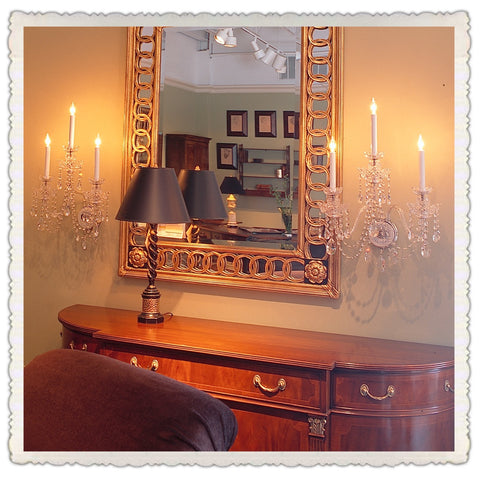
Buffet lamps! Who doesn't love buffet lamps? They aren't just for buffets, but for any side table in your dining room. What distinguishes a buffet lamp from other table lamps is the size... a buffet lamp is usually slender and tall - perfect to fit elegantly on dining room furniture. The height helps bring light up to the center of the room. Of course any type lamp can work, either in pairs or on their own. I've seen large based lamps fit spectacularly on a sideboard.
And, whether you have dining room furniture beyond your table or not, you can put a floor lamp just about anywhere! Floor lamps are ingenious that way. My favorite floor lamps are shaded, but many folks like a torchiere which directs your light up. I like the the traditional shaded floor lamp because it offers less competition to your chandelier's reflections on the ceiling.
The bottom line is that most folks just don't have enough light in their rooms. And, even dining rooms need more than one source of light. I like at least 3 sources of light, or layers of light, in a room.
Happy Lighting!
- King's Chandelier Company
- Tags: #roomglitter FAQ How do I... LightingTips Our Favorite Things Room Ideas
Lowering Your Crystal Chandelier 0
A common dilemma...how do I lower my chandelier?
Maybe you have moved to a home with higher ceilings, or maybe you just think your chandelier should be lower... but either way, you want to add chain to your chandelier so that it hangs closer to the table or floor. How do you do this?
Most importantly, is there enough wire (lamp and ground) on the fixture to accommodate the new length? If not, you will have to change the entire electrical wire from the ceiling box through the stem to where the center wire connects to the arm wires. You will also need to replace the ground wire.
Safety dictates that the wire has to be whole or connected within the proper wire nuts, and because most folks don't want colorful wire nuts visible, we recommend changing the entire length. You can purchase wire here.
Cut the power to the chandelier! To get to the wire connections, you can unscrew the bottom of your chandelier, separate the center wire from the arm wires, pull the old center wire and then replace that center wire with a new one. It should thread through the center pipe easily. Make sure you are using an appropriate wire. The new center wire must connect to the arm wires.
Once you have solved the wire issue, you can turn your attention to adding chain. Either match your existing chain and add in what you need to get the chandelier to the proper height, or replace all the chain with something new.
Make sure you are using an appropriate chain gauge. Using proper tools, such as chain spreaders, makes your job easier. Using care and strength, and cutting the power to your fixture, you can change the wire and chain on a modest sized chandelier without taking the chandelier all the way down.
Keep in mind that these instructions are specific to our crystal chandeliers. If you have one of our Tier models or Victorian models, we can talk you through how to change the wire in those.

- King's Chandelier Company
- Tags: FAQ LightingTips Safety
Putting together pieces for your crystal chandelier... 2
Have you spent hours trying to determine what you need to buy in order to put together a strand of crystals for your chandelier?
Rather than you trying to purchase all the necessary little pieces in bulk and assembling something yourself, let us do the work.

You can send us a photo of exactly what you need. This customer placed his crystal piece on a ruler, but he also gave us the dimension of each piece. We were able to duplicate his crystal strand and his chandelier looks good as new.
How to measure the pins between the crystal? Don't measure the "legs" (pieces that goes into the crystal), just simply measure the decorative part that shows between the crystals.
It can be difficult to match some things exactly - the thickness of a piece of crystal may be slightly different, or the cut may vary a tiny bit. But, we are experts! We will let you know if there are any differences and if we think it will be noticeable.
email: crystal@chandelier.com.
- King's Chandelier Company
- Tags: Chandelier Parts FAQ Maintenance Restoration Files Tools of the Trade
Shopping for your Crystal Chandelier with a Check List 0
Before shopping for a crystal chandelier, you should gather some information in order to make the best choice.

- Budget? You can spend just about any amount on a crystal chandelier, and the truth is, you get what you pay for. Having said that, maybe you only need a cheaper chandelier "just for effect". Or, if you are looking at our site and a few others, you are really looking to invest in heirloom quality. Either way, determining your budget first will help in your selection process.
- Number of Lights? How much light will you need? It may be good to talk to a lighting professional for some guidance. Keep in mind, you will want to have your chandelier on a dimmer.
- Room Size? You will want to measure the width and length of your room and make notes of any architecture features or furniture that make the room seem bigger or smaller.
- Ceiling Height? Very important! You need to know how much room you have before a chandelier would hit your head.
- How will you transport?
- Can you assemble it if necessary, or will you need to have an electrician assemble your new purchase. We always recommend that an electrician make your electrical connection.
- Where to shop? Well, www.chandelier.com, of course!
- King's Chandelier Company
- Tags: Choosing a Chandelier FAQ LightingTips Room Ideas
Should My Crystal Chandelier Be Silver or Brass? 0
One of the harder things for our customers to decide on is which metal finish to use on their crystal chandelier. We've always offered 2 standard finishes: Shiny nickel or shiny brass. However, with patience and a little extra payment, we can have the few metal pieces plated in other colors.
But, back to the original question: how do you decide which? I think of it like I would a diamond ring in a setting. If you choose a silver colored setting (silver, platinum, white gold), the stone's brilliance is enhanced by the less obtrusive metal color. The silver tones blend into the sparkle of the diamond. If you choose gold, then there is a bit of a contrast between the setting and the stone, making the framework part of the show.
Similarly, a crystal in a framework of silver (chrome or nickel, shiny or not) has nothing to get in the way of the sparkle. You see more of the pieces of crystal than you do the body of the chandelier. A gold framework, glows through the crystal, separating it a bit visually and making it a bit warmer.


Choosing a bronze would have a similar impact as the gold - enhancing more of the framework. Depending upon the type of chandelier, this may make a crystal chandelier look aged.
There is no particular reason to choose one over the other, though people think of the using a gold framework if they have a large gold mirror that will be reflecting the chandelier; however, the silver will work in such a situation.
Our best advice is to go with whichever color you like the look of.


- King's Chandelier Company
- Tags: Choosing a Chandelier FAQ How to choose a sconce
How to keep your chandelier from falling out of the ceiling! 3

Can you imagine coming home to this? Or waking up to the sound of this happening? If not horrifying, then it is downright disconcerting. It doesn't happen often, and with the following information, it should never happen to you.
What are some of the best practices for keeping your chandelier safely in the ceiling?
1. Always ensure that your mounting location can support the weight of your chandelier. Is your electrical box properly mounted and secure within your ceiling?
2. The cross bar, pipe, and screw collar of your mounting hardware should be a tight fit, with a locknut fitted against both the cross bar and the screw collar.
3. The above mentioned cross bar should be securely mounted within your electrical box with the long screws that were included with the box.
Those 3 steps are what holds your chandelier in the ceiling, so always make sure that they are performed carefully, correctly, and securely.
4. Never (ever) spin a chandelier on its chain. Actually, don't even turn it. This sounds logical, but believe it or not, it is the number one reason for fallen chandelier. A chandelier revolving on a chain is very mesmerizing - until it unscrews from the ceiling and falls onto your table. The locknuts are designed to help prevent this from occurring, but they need a little help from you. Best practice - you move around the chandelier doing what needs to be done instead of moving it to you.
5. Make sure that the top loop on the chandelier itself is secure and tight. This loop that attaches to the chain is the one thing that is holding your fixture.
6. Finally, make sure that you are using the proper chain weight. Heavy, solid chain that is split on the side (never on the bottom) is the best choice.
Each time you have your chandelier cleaned, the screw loop connection and the top loop on the chandelier should be checked. Are they tight against the locknuts?
By following the above practices, you and your chandelier should have a long, healthy life together!
Reply to comment on 5/31/2018: I'm so sorry that happened to you! If the pipe came down with the screw loop, the pipe will need to be screwed back into the cross bar and make sure to use nuts to lock it in place. If the pipe didn't come down, then the screw loop must be screwed into the pipe. Again, make sure to use nuts. The proper way to accomplish all of this is to disconnect the wires and start the installation from scratch. Good luck! -Nancy
Reply to comment on 7/28/2018 - I sent you a private message. Let me know if you need further information. - Nancy
- King's Chandelier Company
- Tags: FAQ How do I... LightingTips Safety
