Light Conversation — Maintenance
Chandelier Cleaning Time! 0
It is that time of year again... time to get those chandeliers and sconces sparkling for the holidays.
What do you need to know before you start? Some best practices here.
How do you clean a chandelier? Check out our best advice!
Having trouble figuring out the placement of crystal? Click here.
Want to replace your candle covers? Read this post for more info.
Enjoy your shiny and clean fixtures and Happy Holidays!
- Nancy Daniel
- Tags: Chandelier Cleaning Tips Maintenance
How to Measure and Match a Crystal Piece for Replacement on Your Chandelier 0
Are you trying to measure or match your crystal pieces for replacement on your light fixture? We can help!
Measurement:
Ideally you want to get that measurement correct the first time as most folks, including us, charge restocking fees on returns of parts or they don't accept returns at all.
Replacement crystals frequently are sold with an attached octagon or button and a hook. Keep in mind that this top piece is not included in most measurements. In other words, a 2.5" almond is just that... 2.5" of almond shaped crystal with the added bonus of a top piece.
Below is a 2" measured.
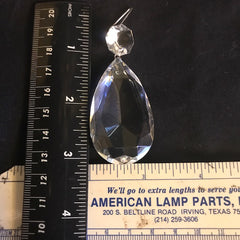
We try to include the overall length (in this case 3.5"), but this height includes the pinning which can make the overall height vary a bit.
When trying to match crystals, it is more important to compare the height than the width. An off width will blend with different crystals better in most cases.
Details:
It can be quite difficult to verify that top "button" and the pinning on the piece you are wanting to purchase is the same as the piece that you need to match. If you are examining our parts, feel free to send specific questions. In most cases, we are happy to change the pinning or top piece for a small fee.
Quality:
Quality is very difficult to determine by photo. Generally, if you tell us the chandelier is pre-1980's, we can assume that the crystal are Italian quality, Czech quality, or Swarovski Strass. What does this mean?
Older Strass is unmistakable. It is thick, heavy and blindingly refractive. Newer Strass is a lighter due to the lack of lead oxide, but it is still gorgeous. (It is also thinner and etched with a trademark.)
"Italian Quality" usually means leaded crystal without great clarity. It is heavy, but whitish looking. Frequently the edges are duller and more molded looking as opposed to cut.
Czech Quality means the good, old stuff! It is a heavy, clear crystal, but not brilliantly sparkly like Strass. Sadly, this is being replaced by a newer, lighter crystal. Good for the environment (no lead) but sad for us traditionalists. Czech quality has edges that look more polished instead of molded.
Hope this is helpful.
- King's Chandelier Company
- Tags: Chandelier Parts How do I... Maintenance Restoration Files
Where does the crystal hang? 2
We are still noticing an upswing in parts related questions and chandelier cleaning related questions. I'm guessing many of you are unhappily furloughed from jobs or simply home-bound due to cancellations and are tackling some tasks around the house.
I've made a few posts about cleaning and safety which you can access from the tags to your right. I haven't addressed how to figure out where everything hangs once you have it clean.
First things first... or, maybe I should say for next time.... take a photo of the chandelier before you start removing crystal. I know we all THINK we will remember where it goes, but trust me, you probably won't.
So, let's assume you have a pile of crystal in front of you and a bare chandelier with no idea what to do.
- Separate the types of prisms/pendants. Even if some have 1 button on top and others have 2 buttons on top, sort them separately.
- Intact strands of crystal should be compared to each other and same length should be laid side to side, untangled, so you can see that they are all the same length. Place bits and pieces aside for the moment.
- Save any loose pins that may have fallen out of the crystal.
- Set aside any other loose pieces or pulled apart pieces.
Okay... so that takes care of the sorting. Now turn your attention to the frame of your chandelier. I find it easiest to sketch it out. I can't draw, so mine are laughable, but helpful.

These numbers give me quite a bit of info.
If you have strands, they will match the number of arms. If they are coming from the stem, then they will come from the 2nd bobeche where there are 8 pins, not the top where there are 12 pins. Look at where the loops are on the arm, under the bobeche. One center loop means those strands probably stretch from the front of that arm to front of the next. No loop on the arm means they probably connect to the bobeche on the arm itself.
If I have 12 of one type of crystal, they probably go on the top. 5 of a different would go on the bottom. Just start matching crystal counts to the number of pins. It is a puzzle, but you will figure it out eventually. As you start to populate the chandelier, you will be able to complete the bits and pieces.
If it is one of ours, you can send us a photo and we can guide you. If not, just web search crystal chandeliers and look at the images shown for ideas.
Some chandeliers, most particularly the metal cage framed chandeliers, are a bit more difficult to figure out. But, work on levels for your counts. Usually, each level of the chandelier will have one style of crystal.
These are not the best of times, and we wish everyone health and comfort. Keep sending your questions... our response time may be a bit slower, but we will answer.
- Nancy Daniel
- Tags: Chandelier Cleaning Tips How do I... Maintenance Restoration Files
How and Where Should You Store a Chandelier 0
The logistics of storing a crystal chandelier are, well, complicated.
Let's tackle the hows first.
Some folks opt for storing a chandelier, intact, hanging in a crate or from a bar of some type in an out of way place. This isn't a bad method as long as you have the room, and everyone knows not to touch. The chandelier should be covered to keep as much dust as possible off of the fixture. Of course, once it is covered no one will know the fragility of the contents underneath, so a CAUTION sign may be a good idea. We don't recommend moving a crystal chandelier in a crate, but for stationary storage, it works well.
We frequently recommend storing crystal chandeliers as if they were packed for moving. That is, each arm taken out of the main stem and wrapped with paper or bubble wrap for cushioning. Crystal trimmings should be wrapped in tissue paper and labeled carefully. Including a diagram of where the crystal belongs on the fixture is a must!
Once everything is wrapped, place the piece in a strong cardboard box with cushioning between the pieces. You want to make sure that pieces can't knock against each other.
Where to store it?
We don't like attics..temperatures are too extreme in attics, at least in most parts of the country. The heat isn't good for the electrical wiring and the candle covers. Garages are better unless your climate is really extreme.
A more climate controlled area is best - somewhere inside the home is ideal. But, of course, the best place to store a chandelier is hanging from your ceiling where everyone can enjoy it.

- King's Chandelier Company
- Tags: How do I... Maintenance Safety
Candle Covers for European Chandelier Sockets 0
We have been having quite a few emails in response to our blog about candle covers, and most of these inquiries are asking about covers for European, E14, chandelier sockets (sometimes called International E14).

This photo does a good job of showing the diameter - both inside and outside. Also, you can see how thick the plastic is. This is a very thick, white matte plastic.
These covers are cut to order and we have added them to our site! As always, if you have any questions, email or call us.
- King's Chandelier Company
- Tags: Chandelier Parts Maintenance
How to Move a Crystal Chandelier AKA How to Dismantle & Pack a Crystal Chandelier 0
You would think "How to Move a Crystal Chandelier" and "How to Dismantle & Pack a Crystal Chandelier" would be two different topics... but they are not! Ask any chandelier restoration expert and they will agree that the best way to move a chandelier is to dismantle it and pack it.
We believe with our whole heart that if you are removing a crystal-armed chandelier from one location and transporting it to another location, it should be taken apart and packed. I know - I hear you say that if you crate it properly, it will be fine. But, it might not be and why take the chance?
If a chandelier hangs within a crate, it can bang around in that crate. If it is secured so that it can't swing, pressure is placed on those tension points. Either scenario can shatter the crystal pieces. And, if you have had it happen, you know how hard it is to match a broken chandelier arm.

We ship thousands of our chandeliers, and we always ship them with the arms removed from the main fixture, wrapped, and packed withing packing pellets. We also carefully wrap then hanging crystal so that these pieces don't touch one another.
Below is the method that we recommend. These instructions will work with many crystal chandeliers made within the last 70 years or so. If your chandelier is an antique, or you think it is exceptionally valuable, please consult a professional.
- Take photos and make diagrams of where all the crystal pendants and strands hang. Don't rely on original instructions.
- Lay out your tissue paper on a table, then carefully place your prisms/pendants on the tissue paper so that they do not touch. Fold the paper with the pendants inside the folds - you will have to be the judge of how many per sheet of paper to use, but you don't want the final result to be so heavy or large that the crystals tear through the paper. Tape and label. For example: Prisms for Top.
- For strands, use the same method as above, making sure that the strands do not tangle. Once the crystals have all been removed, you can work with the chandelier without all the crystals banging against each other.
- Make sure the power to your fixture off!
- Remove the bottom of the chandelier to get to the nuts that are holding the arms onto the fixture. You can see instructions on how to remove the bottom of our chandeliers here and here. Wrap the bottom in bubble wrap.
- Disconnect the wiring from the arms. While holding the outer, heavy part of the arm, unscrew the nut on the underside of the plate that is holding the arm and lift the arm out of the plate. Remove the light bulb and wrap the arm carefully in bubble wrap. Do this for all of the arms.
- Disconnect the chandelier from the ceiling and remove the stem of the chandelier from the chain. Wrap the stem well in bubble wrap.
- Don't forget to remove your chain, canopy, screw loop and cross bar. You will want to take this with you as it might be original to the chandelier.
- In the bottom of a box large enough for the arms, make sure you have some good cushioning material: layered bubble wrap or packing peanuts. Carefully lay the arms in making sure that there is cushion between each and around each arm. Arrange them so that the heavy parts (candle cups and bobeches) are not on top of one another.
- We pack the bottom and crystals in a separate box from the arms.
- Either place the stem in a box or transport it securely without a box.
- If possible, transport the boxes yourself instead of relying on the moving company. They won't treat it as lovingly as you will.
This all may sound a bit time-consuming, but I promise that this method of packing your chandelier will take less time than trying to find matches to broken components of your chandelier!
We will concede that if your chandelier is very small - say 18" wide, you can probably move it without taking it apart. But, we do recommend taking the crystals off so that they don't bang against each other and chip. Don't pack the frame in a box - keep it where you can see it. Simply place it in the seat of your car and place the seat belt around it. And, make sure not to crack it by hitting it on the door frame on the way in and out of the car.
Whatever you do, do it carefully!
- King's Chandelier Company
- Tags: How do I... Maintenance Safety
