Light Conversation — Chandelier Cleaning Tips
Chandelier Cleaning Time! 0
It is that time of year again... time to get those chandeliers and sconces sparkling for the holidays.
What do you need to know before you start? Some best practices here.
How do you clean a chandelier? Check out our best advice!
Having trouble figuring out the placement of crystal? Click here.
Want to replace your candle covers? Read this post for more info.
Enjoy your shiny and clean fixtures and Happy Holidays!
- Nancy Daniel
- Tags: Chandelier Cleaning Tips Maintenance
Where does the crystal hang? 2
We are still noticing an upswing in parts related questions and chandelier cleaning related questions. I'm guessing many of you are unhappily furloughed from jobs or simply home-bound due to cancellations and are tackling some tasks around the house.
I've made a few posts about cleaning and safety which you can access from the tags to your right. I haven't addressed how to figure out where everything hangs once you have it clean.
First things first... or, maybe I should say for next time.... take a photo of the chandelier before you start removing crystal. I know we all THINK we will remember where it goes, but trust me, you probably won't.
So, let's assume you have a pile of crystal in front of you and a bare chandelier with no idea what to do.
- Separate the types of prisms/pendants. Even if some have 1 button on top and others have 2 buttons on top, sort them separately.
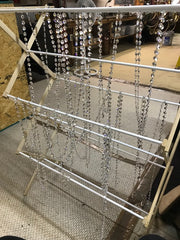
- Intact strands of crystal should be compared to each other and same length should be laid side to side, untangled, so you can see that they are all the same length. Place bits and pieces aside for the moment.
- Save any loose pins that may have fallen out of the crystal.
- Set aside any other loose pieces or pulled apart pieces.
Okay... so that takes care of the sorting. Now turn your attention to the frame of your chandelier. I find it easiest to sketch it out. I can't draw, so mine are laughable, but helpful.

These numbers give me quite a bit of info.
If you have strands, they will match the number of arms. If they are coming from the stem, then they will come from the 2nd bobeche where there are 8 pins, not the top where there are 12 pins. Look at where the loops are on the arm, under the bobeche. One center loop means those strands probably stretch from the front of that arm to front of the next. No loop on the arm means they probably connect to the bobeche on the arm itself.
If I have 12 of one type of crystal, they probably go on the top. 5 of a different would go on the bottom. Just start matching crystal counts to the number of pins. It is a puzzle, but you will figure it out eventually. As you start to populate the chandelier, you will be able to complete the bits and pieces.
If it is one of ours, you can send us a photo and we can guide you. If not, just web search crystal chandeliers and look at the images shown for ideas.
Some chandeliers, most particularly the metal cage framed chandeliers, are a bit more difficult to figure out. But, work on levels for your counts. Usually, each level of the chandelier will have one style of crystal.
These are not the best of times, and we wish everyone health and comfort. Keep sending your questions... our response time may be a bit slower, but we will answer.
- Nancy Daniel
- Tags: Chandelier Cleaning Tips How do I... Maintenance Restoration Files
Pre-Chandelier Cleaning Check List 1
Judging by the questions and orders that are coming in, many of you are being quite productive during this trying time at home and are cleaning your chandeliers and sconces.
You can find our cleaning instructions on this website.
Before you begin cleaning, however, there are a few safe guards you should take.
- Most importantly, if you can, make sure that the screw loop in your ceiling connection is tight. These can loosen over the years, particularly if the chandelier is turned for cleaning and bulb changing. Turn to the right to tighten (righty tighty, lefty loosey).
- Turn off the fixture - many of us have scars to prove how hot incandescent light bulbs can get.
- Place a padding of some type on the surface beneath the chandelier. (Moving quilts or comforters work great. If they are on the floor, take care to spread them out well and don't trip.) It will protect that surface and offer a measure of protection to whatever is falling. You may end up with only one damaged prism, but sometimes that old prism is no longer available for purchase.
- Verify that the bottom of your chandelier and the connecting ball are securely in place. If you decide to remove the bottom of the chandelier, read this first. This process is a little bit tricky, so be careful!
- Practice ladder safety...the spreaders should be firmly secure and the ladder feet should be flat on your floor. If you move your ladder once you have started cleaning, make sure to remove tools or items from the shelf and top.
You can find more tips and cleaning advice on our blog
- King's Chandelier Company
- Tags: Chandelier Cleaning Tips Safety
Removing the Bottom of Our Crystal Chandeliers 2
One of our most common "how do I's" is how do I remove the bottom of my crystal chandelier. We made a little video for our YouTube channel that is linked here.


These instructions are general. Keep in mind that chandeliers are built by hand and installed by human beings and are all different. What works for one may not work for another.

- King's Chandelier Company
- Tags: Chandelier Cleaning Tips Chandelier Parts How do I... Maintenance Restoration Files
Tools of the Trade - Colander 0
When cleaning a chandelier, what do you do with all of those little crystal parts that come from the chandelier?
If you read our cleaning instructions, you will see us mention placing them in a colander - preferably a plastic one ... or two ... or three depending upon how many crystal pendants your chandelier holds.
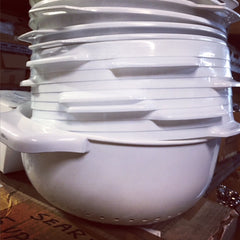
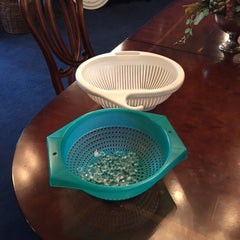
Because plastic is softer than metal and won't damage the crystal, we recommend plastic colanders. They are relatively cheap and available.
As you remove the crystal pendants from your chandelier, place them in the colander. Don't fill it too full; you will get the best results with less than a third full. Sparingly, sprinkle your dish washing liquid (or whatever you want to use for cleaning your chandelier) over the crystals and place the colander directly under your water stream to rinse using hot water.
Once the water runs clear, you can set your colander on a towel and begin wiping the crystals dry. As you wipe each one, place it on the towel. Once all are done, place a layer of paper towels into the bottom of the colander. This paper towel will keep the hooks from getting stuck in the holes. You can also layer your crystal with paper towels if you like. Place your pendants back into the colander and rehang them on your chandelier.
Happy Cleaning!
- King's Chandelier Company
- Tags: Chandelier Cleaning Tips Maintenance Tools of the Trade
Pollen-be-gone! or, How to Clean Your Crystal Chandelier 0
The pollen is slowly dwindling around here, so things can actually be cleaned. Alex is busy in the showroom removing the yellow-green dust from all of the lights. For your guide to cleaning a chandelier, go here: Clean If you don’t want to clean your chandelier yourself, check your yellow pages or Angie’s List for … Continue reading Pollen-be-gone! or, How to Clean Your Crystal Chandelier- Nancy Daniel
- Tags: Chandelier Cleaning Tips

